

Step 1: Choose Your Material & Size
Your wedding welcome sign is available in two sizes and three material options to suit your preference:
Sizes: Choose between A3 (smaller and more intimate) or A2 (larger and more prominent).
Materials:
3mm Foam Board – Lightweight yet sturdy with a smooth finish. (Indoor use only)
5mm Foam Board – Thicker and more rigid for extra durability. (Indoor use only)
3mm Acrylic – A sleek, modern option with a polished look. (Indoor and outdoor use)
Each option ensures a high-quality, rigid board sign that enhances your wedding reception decor.
Step 2: Choose Your Style Layout
Your sign’s style layout determines how the eucalyptus greenery is arranged. You can choose from four beautiful options:
Portrait Style 1 – Elegant eucalyptus foliage framing the top corners.
Portrait Style 2 – A lush eucalyptus arrangement flowing from the bottom right corner.
Landscape Style 1 – A graceful cluster of eucalyptus in the top left and right corners.
Landscape Style 2 – A cascading eucalyptus arrangement from the bottom right corner.
Each layout adds a unique touch of nature-inspired elements to your wedding decor, whether you prefer a minimalist wedding look or a more romantic and contemporary aesthetic.

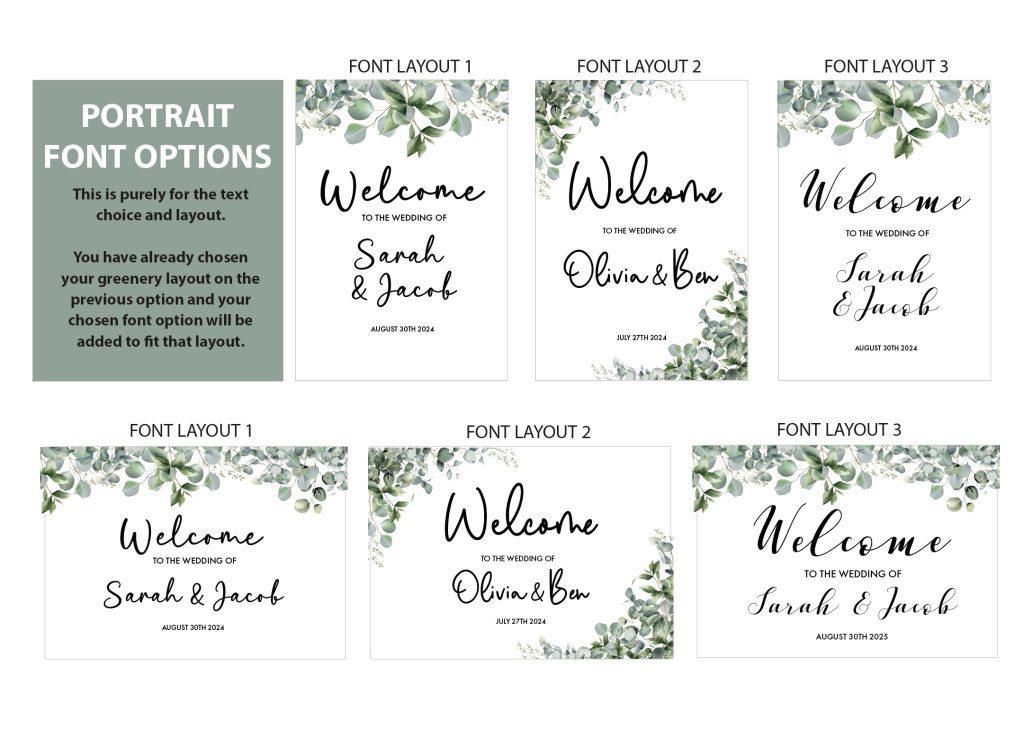
Step 3: Choose Your Font Layout
Once you’ve selected your style layout, it’s time to pick your font layout. This determines how your text will be displayed on the sign.
Font Layout 1 – A mix of modern script and clean typeface for a balanced, contemporary look.
Font Layout 2 – A chic and modern handwritten-style script for an effortless and romantic feel.
Font Layout 3 – A timeless, elegant calligraphy-inspired font for a sophisticated touch.
These three font choices allow you to match your wedding welcome sign with your overall wedding stationery and theme.
Step 4: Add Your Personalisation Details
Make your wedding sign truly yours by adding your names and wedding date.
Enter your names exactly as you’d like them to appear. (It’s customary for the bride’s name to appear first).
Add your wedding date in your preferred format (e.g., August 30th, 2025 or 30/08/2025).
Double-check your spelling before submitting, as personalised items are final once printed.
This step ensures that your custom wedding sign is designed just for you, making it a cherished part of your wedding reception decor.
Step 5: Approve Your Digital Proof (Optional)
For complete peace of mind, you can request an artwork proof before printing (available at an additional charge). This ensures everything is perfect before production begins.
Ready to Personalise Your Wedding Welcome Sign?
Make a lasting first impression with a custom wedding sign that celebrates your special day with nature-inspired designs and eucalyptus greenery. Select your style, font, material, size, and personalisation details, and let’s create something truly beautiful for your wedding!
For any questions, feel free to reach out – we’re happy to help make your wedding preparations seamless and stress-free.
 https://m.me/bluenellie